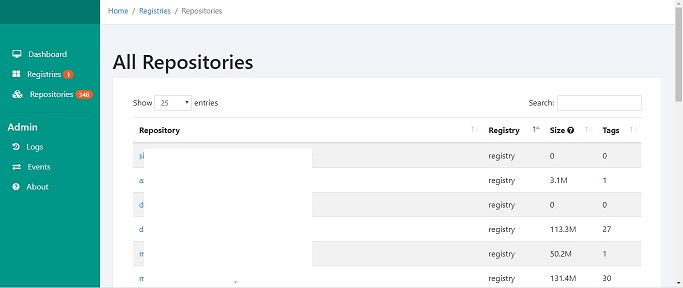
Featured Posts

GoAccess is an interactive and website / web-server log analyzer tool currently better than the ApacheTop interface. It provides fast and valuable HTTP statistics for system administrators that require a visual...

Readmore

AjaxMyTop AjaxMyTop is a Web-based tool featuring an AJAX user interface for monitoring a MySQL server. Installing and configuring is fairly simple which you can done it within 2 minutes. [caption id="attachment_587"...

Readmore

Mod_spin is a content handler and/or a filter, meaning, for a specified file extension, mod_spin will read the file (or other input), parse it into an Abstract Syntax Tree (AST) and then replace the occurrences...

Readmore

Server Monitoring using DSTAT DSTAT an excellent tool which combines the overall stats of vmstat, iostat, netstat and ifstat. Dstat allows us to view all of the system resources in the real-time including the network bandwidth, network...

Readmore

BWM-NG Monitoring Network Bandwidth and Disk I/O using BWM-NG BWN-NG (Bandwidth-NG) is old and simple tool to monitor the bandwidth and disk I/O including the RAMdisk usage, this tool really helps the...

Readmore

  • Prev
  • Next

Varnish HTTP accelerator Cpanel

Posted on : 02-11-2011 | By : admin | In : CPanel / WHM

0

About


This article is for user who want to optimize single website with Varnish HTTP accelerator running on shared Cpanel servers to reduce the load. Varnish Cache is an open source, state of the art web application accelerator. You install it on your web server and it makes your website fly. We can put the Varnish on port 80 to handle/cache the web page request and apache on other port. Before going through the installations, following are the per-requests which you need to met to configure correctly on your server or vps.


Pre-Requests


1 -> Full root access to the server.
2 -> Dedicated ip address (for example if you want to optimize the website www.site1.com then the site1.com should be on a dedicated ip address).
3 -> Changing the Listen & NameVirtualHost for the dedicated ip to listen on port 7070.


Installing Varnish accellerator using YUM


Installation is pretty simple using the yum (varnish-cache.org repository). Just follow the steps below to :


Installing Varnish from source


If you are running centOS or RHEL based system.

For the installation instruction for various distributions check (here)


Configuring Varnish accellerator


Setting up Apache


Since we are going to configure varnish only for one domain and not for the entire domain hosted sharely. That domain (for example : www.site1.com ) should have a dedicated ip address (for example ip address : 192.168.1.10). Edit the httpd.conf file and alter the lines below :


  • # vi /etc/httpd/conf/httpd.conf

Search for the line Listen 0.0.0.0:80 and comment it out #Listen 0.0.0.0:80. Not add the new Listen lines for all the ips listeted in your server (for example if your server has 3 ips 192.168.1.8 , 192.168.1.9 , 192.168.1.10 ) add it as below

#Listen 0.0.0.0:80
Listen 192.168.1.8:80
Listen 192.168.1.9:80
Listen 192.168.1.10:7070

Since the www.site1.com is hosted on a dedicated ip address, we need to switch the default apache port to 7070 so that we can run varnish on port 80. Also search for the NameVirtualHost 192.168.1.10:80 and change it as below :


NameVirtualHost 192.168.1.10:7070

And also the <VirtualHost 192.168.1.10:80> to

<VirtualHost 192.168.1.10:7070>

Chattr the httpd conf file

  • # chattr +i httpd.conf

Now restart the apache server to take this effect.

  • # service httpd restart

Use lsof -i tcp:7070 command from your shell to verify it is running on port 7070 and also make sure the port is open in your firewall.


Setting up Varnish with apache


After done with the apache part the next part is to configure the varnish accellerator. Edit the varnish config file and uncomment the following lines :

  • #backend default {
  • #      .host = “127.0.0.1″;
  • #      .port = “80″;
  • #}

Change it to

  • backend default {
  •       .host = “192.168.1.10″;
  •       .port = “7070″;
  • }

Save and exit. This is to setup varish to connect with the backend server (apache) on port 7070 as we setup 192.168.1.10 ip to listen on port 7070 earlier.


Starting Varnish cache deamon


Restart up your web server and then start varnish:

  • # varnishd -f /etc/varnish/default.vcl -s malloc,1G -T 127.0.0.1:2000 -a 192.168.1.10:80

-s malloc,1G

The -s options chooses the storage type Varnish should use for storing its content. I used the type malloc, which just uses memory for storage.

-T 127.0.0.1:2000

Varnish has a built-in text-based administration interface. Activating the interface makes Varnish manageble without stopping it.

-a 192.168.1.10:80

Will start the varnish cache on port 80 binding on ip : 192.168.1.10 pulling the content from apache running on 192.168.1.10:7070.

Now open your web broswer and try access the url http://192.168.1.10 or http://www.site1.com it should start loading your web pages at good speed. To check the varnish cache running, shutdown your apache and try access the url again. You will get a 503 error something like the below.

Error 503 Service Unavailable

Service Unavailable
Guru Meditation:
Varnish cache server


Monitoring Varnish

varnishtop

You can use varnishtop to identify what URLs are hitting the backend the most. varnishtop -i txurl is an essential command. Screen-caps below :


Varnish HTTP accelerator Cpanel

VarnishTop

varnishhist

The varnishhist utility reads varnishd(1) shared memory logs and presents a continuously updated histogram showing the distribution of the last N requests by their processing. The value of N and the vertical scale are displayed in the top left corner. The horizontal scale is logarithmic. Hits are marked with a pipe character (“|”), and misses are marked with a hash character (“#”).

Varnish HTTP accelerator Cpanel

Varnishhit-stat


Useful Source :


Varnish Home page : Click here
varnishd Man page : Click here

Extundelete

Posted on : 25-10-2011 | By : admin | In : Admin Tools

Tags:

0

Extundelete is a simple and effective tool helps to recover files / directory from ext3 and ext4 filesystems. Although many recovery tools are available this tool is really so simple and a real life saver for admins or user who accidently removed any important files or directory. Extundelete uses the information stored in the partition’s journal to attempt to recover a file that has been deleted from the partition.


Installing Extundelete


Source installation is simple and it can be done in just 2 minutes. Before installing it from source, make sure you have already installed the e2fsprogs version 1.41 and e2fslibs packages (for centOS / rhel based system package names are e2fsprogs  & e2fsprogs-libs). Ssh your server as root.


How to use Extundelete


Let us try a demo delete / recovery files / folders to get familer with this tool. I have tried a testing in one of my drive partiton /dev/sdb1 mounted as /backup. Create a folder named gnutool-delete under /backup and copy some of the files/directories inside this folder. For example


  • # mkdir -p /backup/gnutool-delete
    # cd /backup/gnutool-delete
    # man man > file1-test.txt
    # man man > file2-test.txt
    #mkdir folder1; cd folder1; man man > file1-test.txt


Now delete the folder using rm -rf


  • # rm -rf /backup/gnutool-delete


Once you have removed the folder you have to act quicker and either unmount or remount the partiton as read-only (For how to remount as readonly click here) as soon as possible to avoid overwritting of files/folder with new inodes. Since i have the /backup mounted on /dev/sdb1, all i did was


  • # umount /backup


Recovering deleted files using Extundelete


Extundelete will restore any files it finds to a subdirectory of the current directory named “RECOVERED_FILES”. To run the program, type “extundelete –help” to see various options available to you.  To recover all the deleted folder files :


  • # extundelete /dev/sdb1 –restore-all


This will take a couple of minutes to read the directory structure and looking for a recoverable file within it. It will start recovering the files under the sub directory “RECOVERED_FILES” of the current directory. If you want to recover a large sized data files make sure your current directory is capable of holding the size.


  • # cd RECOVERED_FILES
    # ls


You will be able to see the directory “gnutool-delete” with all the files which was deleted before. You can also use the following syntax if you just want to recover the deleted folder “gnutool-delete” instead of recovering all.


  • # extundelete /dev/sdb1 —-restore-directory /backup/gnutool-delete


Recovering the / partition files


If you have deleted something under the / primary partiton for example /etc/passwd and want to recover that file. Try (i assume that you have addition harddrive to store the recovered file).


  • # mount -o remount,ro /
    # cd /secondarydrive (should have read/write access)
    # extundelete / —-restore-files /etc/passwd
    # cd RECOVERED_FILES
    # ls


You should be able to see the passwd file which was removed before.


NOTE : There is no guarantee that any particular file will be able to be undeleted, so always try to have a good backup system in place, or at least put one in place after recovering your files!


UseFul Links


Extundelete home page
Extundelete command line options
How to mount filesystem as readonly

Linux Compression Tools

Posted on : 25-10-2011 | By : admin | In : Admin Tools

Tags:

0

There are two main compression utilities used in GNU/Linux. It’s normal to first “tar” a bunch of files (using the tar program of course) and then compress them with either bzip2 or gzip. Of course either of these tools could be used without tar, although they are not designed to work on more than one file (they use the UNIX tools philosophy, let tar group the files, they will do the compression…this simplifies their program). It’s normal to use tar and then use these tools on them, or use tar with the correct options to use these compression programs.


Linux Compression Tools

GNU zip (gzip)

zip is the GNU zip compression program and probably the most common compression format on UNIX−like operating systems.

  • # gzip your_tar_file.tar

This will compress a tar archive with GNU zip, usually with a .gz extension. Gzip can compress any type of file, it doesn’t have to be a tar archive.

  • # gunzip your_file.gz

This will decompress a gzipped file, and leave the contents in the current directory.


Linux Compression Toolsbzip2


bzip2 is a newer compression program taht offers superior compression to gzip at the cost of more processor time.


  • # bzip2 your_tar_file.tar


This will compress a tar archive with the bzip2 compression program, usually with a .bz extension. bzip2 can compress any type of file, it doesn’t have to be a tar archive.


  • # bunzip2 your_file.tar.bz2


This will decompress a file compressed by bzip2, and leave the contents in the current directory.


Linux Compression Toolszipinfo


Use zipinfo to find detailed information about a zip archive (the ones usually generally used by ms−dos and windows, for example winzip).


Command syntax:


  • # zipinfo zip_file.zip


Linux Compression Toolszipgrep

Will run grep to look for files within a zip file (ms−dos style, for example winzip) without manually decompressing the file first.


Command syntax:

  • # zipgrep pattern zip_file.zip


bzip2recover


Used to recover files from a damaged bzip2 archive. It simply extracts out all the working blocks as there own bzip2 archives, you can than use bzip2 −t on each file to test the integrity of them and extract the working files.

  • # bzip2recover filename


bzme


Will convert a file that is zipped or gzipped to a file compressed using bzip2.

Command syntax:

  • # bzme filename


Both gzip and bzip2 supply tools to work within compressed files for example listing the files within the archive, running less on them, using grep to find files within the archive et cetera. For gzip the commands are prefixed with z, zcat, zless, zgrep. For bzip2 the commands are prefixed with bz, bzcat, bzless, bzgrep.


1 2 3 4 5 6 7 8 9 10 .... 58 59   Next Page »