About
This article is for user who want to optimize single website with Varnish HTTP accelerator running on shared Cpanel servers to reduce the load. Varnish Cache is an open source, state of the art web application accelerator. You install it on your web server and it makes your website fly. We can put the Varnish on port 80 to handle/cache the web page request and apache on other port. Before going through the installations, following are the per-requests which you need to met to configure correctly on your server or vps.
Pre-Requests
1 -> Full root access to the server.
2 -> Dedicated ip address (for example if you want to optimize the website www.site1.com then the site1.com should be on a dedicated ip address).
3 -> Changing the Listen & NameVirtualHost for the dedicated ip to listen on port 7070.
Installing Varnish accellerator using YUM
Installation is pretty simple using the yum (varnish-cache.org repository). Just follow the steps below to :
- # rpm –nosignature -i http://repo.varnish-cache.org/redhat/varnish-3.0/el5/noarch/varnish-release-3.0-1.noarch.rpm
- # yum install varnish
Installing Varnish from source
If you are running centOS or RHEL based system.
- # cd /usr/src
- # wget http://repo.varnish-cache.org/source/varnish-3.0.2.tar.gz
- # tar zxvf varnish-3.0.2.tar.gz
- # cd varnish-3.0.2
- # ./configure
- # make && make install
For the installation instruction for various distributions check (here)
Configuring Varnish accellerator
Setting up Apache
Since we are going to configure varnish only for one domain and not for the entire domain hosted sharely. That domain (for example : www.site1.com ) should have a dedicated ip address (for example ip address : 192.168.1.10). Edit the httpd.conf file and alter the lines below :
- # vi /etc/httpd/conf/httpd.conf
Search for the line Listen 0.0.0.0:80 and comment it out #Listen 0.0.0.0:80. Not add the new Listen lines for all the ips listeted in your server (for example if your server has 3 ips 192.168.1.8 , 192.168.1.9 , 192.168.1.10 ) add it as below
#Listen 0.0.0.0:80
Listen 192.168.1.8:80
Listen 192.168.1.9:80
Listen 192.168.1.10:7070
Since the www.site1.com is hosted on a dedicated ip address, we need to switch the default apache port to 7070 so that we can run varnish on port 80. Also search for the NameVirtualHost 192.168.1.10:80 and change it as below :
NameVirtualHost 192.168.1.10:7070
And also the <VirtualHost 192.168.1.10:80> to
<VirtualHost 192.168.1.10:7070>
Chattr the httpd conf file
- # chattr +i httpd.conf
Now restart the apache server to take this effect.
- # service httpd restart
Use lsof -i tcp:7070 command from your shell to verify it is running on port 7070 and also make sure the port is open in your firewall.
Setting up Varnish with apache
After done with the apache part the next part is to configure the varnish accellerator. Edit the varnish config file and uncomment the following lines :
- #backend default {
- # .host = “127.0.0.1”;
- # .port = “80”;
- #}
Change it to
- backend default {
- .host = “192.168.1.10”;
- .port = “7070”;
- }
Save and exit. This is to setup varish to connect with the backend server (apache) on port 7070 as we setup 192.168.1.10 ip to listen on port 7070 earlier.
Starting Varnish cache deamon
Restart up your web server and then start varnish:
- # varnishd -f /etc/varnish/default.vcl -s malloc,1G -T 127.0.0.1:2000 -a 192.168.1.10:80
-s malloc,1G
The -s options chooses the storage type Varnish should use for storing its content. I used the type malloc, which just uses memory for storage.
-T 127.0.0.1:2000
Varnish has a built-in text-based administration interface. Activating the interface makes Varnish manageble without stopping it.
-a 192.168.1.10:80
Will start the varnish cache on port 80 binding on ip : 192.168.1.10 pulling the content from apache running on 192.168.1.10:7070.
Now open your web broswer and try access the url http://192.168.1.10 or http://www.site1.com it should start loading your web pages at good speed. To check the varnish cache running, shutdown your apache and try access the url again. You will get a 503 error something like the below.
Error 503 Service Unavailable
Service Unavailable
Guru Meditation:
Varnish cache server
Monitoring Varnish
varnishtop
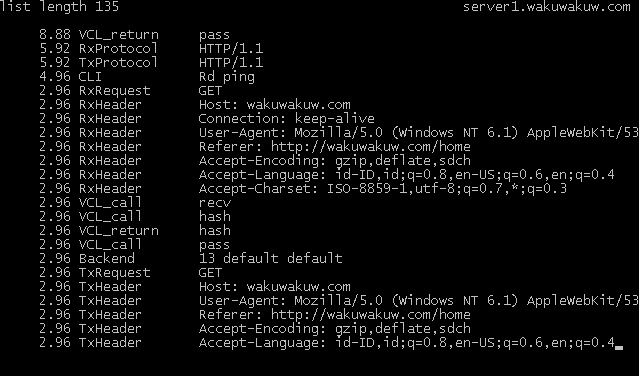
You can use varnishtop to identify what URLs are hitting the backend the most. varnishtop -i txurl is an essential command. Screen-caps below :
varnishhist
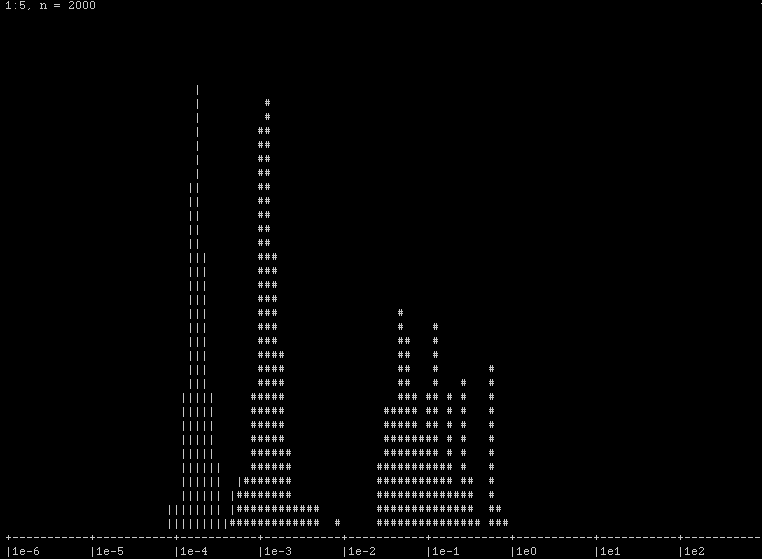
The varnishhist utility reads varnishd(1) shared memory logs and presents a continuously updated histogram showing the distribution of the last N requests by their processing. The value of N and the vertical scale are displayed in the top left corner. The horizontal scale is logarithmic. Hits are marked with a pipe character (“|”), and misses are marked with a hash character (“#”).
Useful Source :
Varnish Home page : Click here
varnishd Man page : Click here


